

The first part highlighted how VALD technology, such as force plates and the Nordboard, helps us assess, plan, and monitor players effectively during the offseason. By combining early testing, embedded assessments, and personalized training plans, we ensure players are ready for the demands of preseason.
In Part 2, we’ll focus on specific variables these tools measure—such as dynamic strength index, power, and reactive strength—and how to use this data to create impactful training interventions and optimize player readiness.
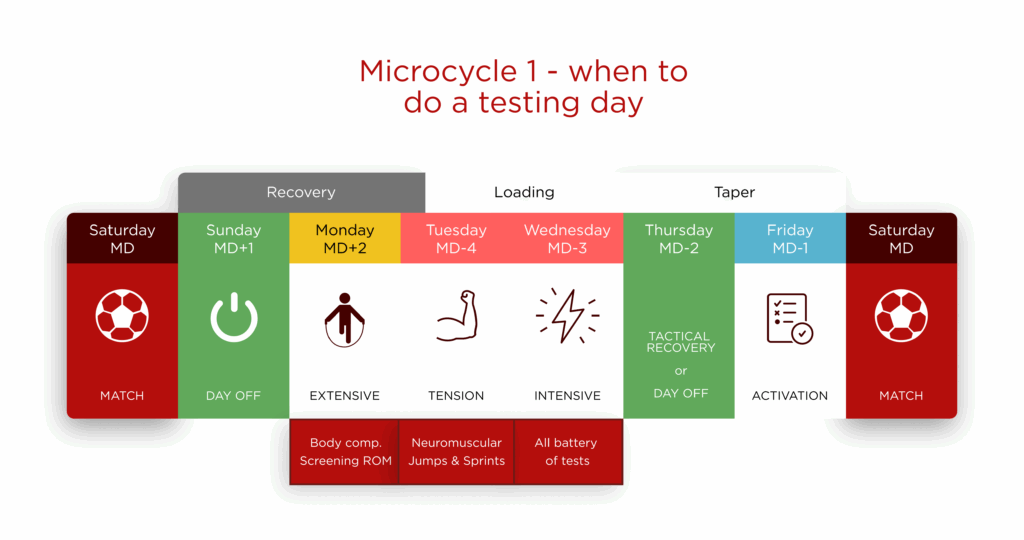
Testing in Preseason
When it comes to the start of preseason, it’s a common practice to jump straight into testing procedures during the first few days. However, I’m not particularly a fan of this approach, especially when it comes to testing high-velocity qualities. My hesitation stems from a past experience with sprint testing that didn’t go as planned (don’t worry, I’m still friends with that player! 😅).
If I can, I usually like to start the preseason on a Friday the week before. This allows for an introduction session and information-gathering phase over Friday and Saturday before diving into intense physical evaluations. Here’s how I approach the process:
Day 1: Collecting the Foundations
- Medical Status: Understanding the players’ current health conditions is essential.
- Range of Motion and Posture Assessments: These help identify imbalances or potential risks before the season kicks off.
- Gym Work: Light gym sessions introduce the players to structured movement patterns and exercises.
- Field Work: Basic drills and movement work on the pitch to reintroduce game-like dynamics. Day 2: Data Collection
This is where the magic happens. With the team already warmed up to preseason activities, I shift the focus to data-driven testing:
- Force Plates: Collecting metrics like jump power, force production, and asymmetries.
- Nordic Hamstring Device: Measuring eccentric hamstring strength to assess injury risk and readiness.
Selecting Tests: Simplifying the Data Tsunami
It’s no secret that picking the right tests is challenging. There’s a temptation to collect all the data we can, but as Jo Clubb wisely puts it, the “data tsunami” of recent years can make it overwhelming to find meaningful insights.
When narrowing down the testing battery, here are some guiding principles:
- Choose Tests That Tell a Story: Each test should add a unique layer to your understanding of the players.
- Focus on Practical Use: Avoid overloading with data you don’t know how to apply.
- Think Holistically: Combine tests to form a complete picture rather than relying on a single metric.
In my preseason testing battery, I typically include 7 key tests, ranging from force plates to sprints, nordic hamstring tests, and more. Each test serves a purpose, helping create a roadmap for individual player development and overall team readiness.
For more details on how to filter through the flood of data, check out Part One of this series here: Using VALDTechnology in Football.
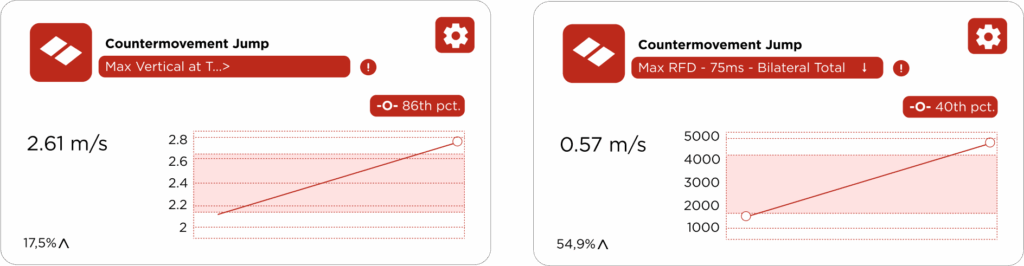
Countermovement Jump (CMJ)
When it comes to force plates, the Countermovement Jump (CMJ) is my favorite test. This jump provides a wealth of practical insights into a player’s “engine,” specifically the neuromuscular capabilities of their lower body.
Why No Hands?
I prefer performing the CMJ without arm involvement. This approach isolates the lower body and allows us to evaluate its full neuromuscular potential without interference from upper body momentum.
Cueing: The Key to Meaningful Data
How we instruct players to perform the CMJ—cueing—is critical to ensuring the results are accurate and aligned with our goals. Depending on what we want to evaluate, we can cue players to:
- Jump as fast as possible: Focus on explosive speed and quick force production.
- Jump as high as possible: Maximize vertical height to assess power output.
- Combine both: A balance of speed and height, which is often the most practical cue for preseason testing.
For preseason, I find the combination approach most appropriate, as it gives a comprehensive picture of the player’s readiness.
During one of my typical talks about football and physical conditioning, I came across the Quadrant System book by Daniel Bove and immediately loved the idea (thank you Domagoj Perić for showing me this). I read the first book two years ago, and just a few weeks ago, I got the new one, Takeoff – if you haven’t checked it out yet, you should do so.
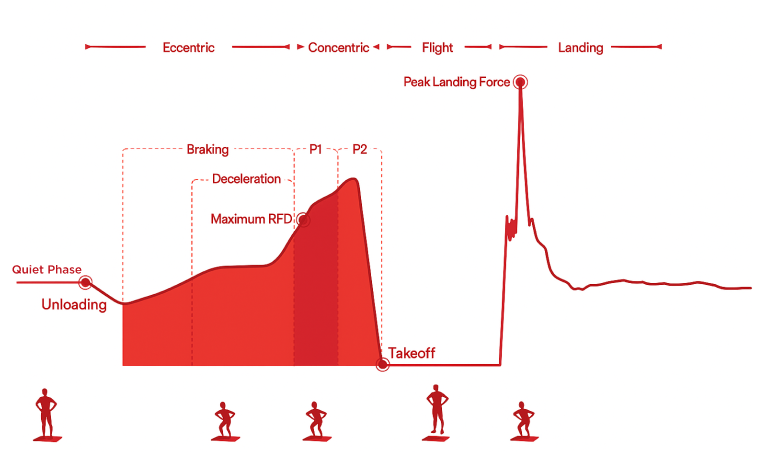
When it comes to analyzing the performance of CMJ, after defining the hand position and queuing, I like to check height values and time values, such as jump height and contraction time. These two variables will tell me how fast the player performed the contraction and how high they jumped (in cm). Based on this, I can categorize the player into one of the quadrants: fast and high, slow and low, fast and low, or slow and high.
After that, I can separate each phase of the jump and analyze the variables of force and speed to determine what happens at each stage of the jump, both on a bilateral and unilateral level.
Profiling and Monitoring Variables in Countermovement Jump (CMJ)
When analyzing CMJ, we can divide variables into profiling and monitoring categories. Profiling establishes the baseline for player capabilities, while monitoring tracks changes over time.
Let’s define some key variables used for profiling and explain their significance:
Level 1 Analysis
1. Jump Height Using the Impulse Method
- What it Measures: Estimates the vertical jump height based on the impulse-momentum relationship rather than just flight time.
- How It Works:Impulse is the product of force and time, and this method calculates how much force is applied during the jump take-off.Unlike flight-time-based methods, it factors in the entire force-time curve for a more precise jump height measurement.
- Why It’s Important:The impulse method provides a more comprehensive understanding of the player’s force application and can account for differences in body position during takeoff.This is particularly useful for athletes with unique jumping mechanics.

2. Contraction time
Contraction time consist of the start of the movement until the athlete leave the ground at the end of takeoff. This means that CT is the sum of unweighting phase, breaking and propulsive duration (Bove, 2024). The CT can be used for monitoring to track fatigue levels and if we noticed some changes here, we can go deeper into analysis
3. Flight Time: Contact Time (FT:CT)
- What it Measures: The ratio between the time spent in the air (flight time) and the time spent on the ground (contact time) during the jump.
- Why It’s Important:A higher FT:CT ratio suggests efficient force production and explosive power.Useful for identifying players who can jump quickly and explosively.
- Interpretation:A low FT:CT ratio might indicate inefficient force transfer or prolonged ground contact, often due to strength deficits or poor technique.
Do not forget to check both variables.
4. Reactive Strength Index (Mod)
The modified Reactive Strength Index (RSI) is the ratio between contraction time and jump height (velocity at takeoff). It’s a great variable to track changes in performance and readiness. This ratio gives us an overall picture, but we can also dive deeper into the analysis to see which variables are changing in relation to the training program we have implemented. In this way, when moving to the next phase of training, we can focus more on contraction time or height, depending on what needs to be addressed.
5. Time to Peak Force
What matters here is how quickly the athlete is able to produce high levels of force

Level 2. Analysis
5. Eccentric Peak Velocity
- What it Measures: The peak downward velocity during the eccentric (lowering) phase of the jump.
- Why It’s Important: A critical variable for assessing jump quality and the athlete’s ability to decelerate during the pre-jump phase. Cohen et al. (2020) recommend a minimum eccentric peak velocity of -1.2 m/s for healthy individuals. Slower eccentric speeds may indicate inefficient deceleration or suboptimal pre-stretch strategies.
- Interpretation:Athletes with slower eccentric velocities might need to work on reactive strength or neuromuscular coordination. But can be also an effort problem.
6. Concentric and Eccentric Impulse
- What it Measures: Eccentric Impulse: The force generated during the lowering phase of the jump, essential for storing elastic energy and preparing for take-off. Concentric Impulse: The force generated during the upward (jumping) phase of the movement.
- Why It’s Important:A balanced eccentric and concentric impulse is critical for jump efficiency and injury prevention. Left-to-right asymmetries in either phase can highlight imbalances that may increase injury risk.
- Practical Application:If the eccentric impulse on the right leg is significantly lower, it might indicate weaker deceleration capacity or neuromuscular deficits on that side.Similarly, low concentric impulse can suggest poor power output during takeoff, which could be addressed with targeted strength and power training.
7. Maximal Force in Newtons
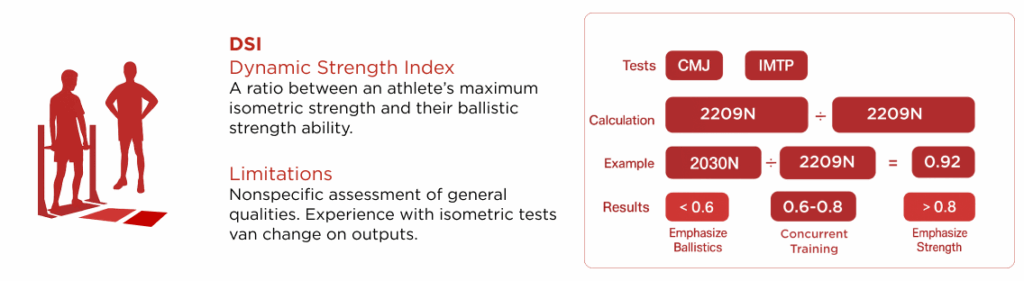
Max Force in the CMJ refers to the highest force an athlete produces during the jumping movement, typically occurring at the end of the eccentric phase or during the transition to the concentric phase. This variable will be later important for comparison with maximal force values during IMTP to establish Dynamic strength index.
Level 3 Analysis
Left and right leg
In Level 3 analysis of CMJ variables, we include unilateral differences during different phases of the jump to gain deeper insight into the entire movement pattern. During our testing procedures with teams, we often observed significant changes in the concentric and eccentric impulse, as well as in peak landing force during the final phase of the jump, particularly in players who had a history of injury.
A few days ago, we tested a former player who had an ACL injury on his right leg. During the first two jumps, we noticed that his concentric and eccentric impulse on the left leg was higher than on the right. Interestingly, his landing force on the right leg was 18% higher. After presenting him with the results and graphical visualizations, we observed that by the third and fourth repetitions, he managed to equalize these differences.
This suggests that, on a subconscious level, he was relying less on his right leg during the braking phase and propulsive phase, likely as a residual adaptation from his previous injury. With proper feedback and further training, he could potentially restore symmetry and improve overall performance.

Defining what asymmetry is important is tricky question. More about it in next part.
Zaključak
By analyzing variables such as contraction time, jump height, and eccentric-concentric impulses, we gain a comprehensive understanding of players’ neuromuscular capabilities and movement patterns.
The case study of the player with a prior ACL injury highlights the value of detailed unilateral analysis in identifying residual imbalances and compensatory strategies. Subconscious reliance on one leg during key phases like braking and propulsion underscores the importance of providing athletes with feedback and individualized training to restore balance and improve movement efficiency.