
This week is full of high-level football education: three days with UEFA Pro lecturers, followed by this seminar for coaches from the Women’s Football Clubs of the Zagreb area, and soon after, UEFA Fitness A in Slovenia. A lot of football talks these days :D.
But in the midst of all that high-performance talk, we often forget to ask a basic question: What’s happening in our own backyard? What kind of conditioning work are we actually doing here? What do our girls get from session to session? What’s realistic to ask from coaches who have no staff, no GPS, no recovery room, and maybe only two sessions per week on half a pitch?
We watch the Women’s EURO, admire the intensity, the movement, the decision-making, the sprints — and then we try to apply the same principles to our teams. But what if our reality is far from elite? What if we only have one coach, no equipment, and a desire to do the best we can?
In this episode — or better yet, in this manual — I’ll try to connect some performance and conditioning insights from UEFA Women’s EURO 2025 with practical, low-cost training ideas you can use right now, in your clubs, on your pitches, with the players you have. No matter the level. No excuses.
What the Goals and the Game Tell Us – EURO 2025 Physical & Tactical Trends
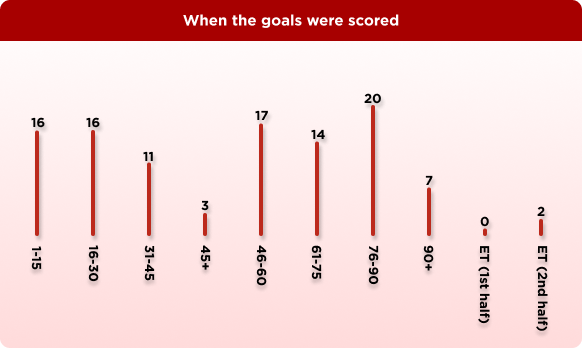
When Were the Goals Scored? A Breakdown of the Game Rhythm
Analysis of the scoring timeline from UEFA Women’s EURO 2025 reveals trends in physical performance and match dynamics.
Goal Distribution by Match Period:
- 76–90 minutes → 🟥 20 goals (most productive period)
- 1–15 minutes → 🟨 16 goals
- 16–30 minutes → 🟨 16 goals
- 46–60 minutes → 🟧 17 goals
- 61–75 minutes → 🟧 14 goals
- 31–45 minutes → 🟨 11 goals
- 90+ minutes → 🟨 7 goals
- 45+ (1st half added time) → 🟩 3 goals
- ET 1st half → ⬜ 0 goals
- ET 2nd half → ⬜ 2 goals
- Explosive Finishes: The highest number of goals came in the final 15 minutes, indicating:
- Strong Starts: High goal numbers in the first 30 minutes point to:
- Extra Time = Energy Gap: Extended periods (ET) remain low in scoring — physical limits still dominate this phase of the game.
Physical Trends in Women’s Football (2020–2025)
1. Increased High-Intensity Running (HIR) and Sprint Load
- FIFA data (2023) shows a 20% increase in HIR vs. 2015
- In 2025, averages for top-level players :800+ meters HIR per match for midfielders and wide players
- 60+ sprints per match in elite teams (Source: FIFA Training Centre)
2. Greater Speed Capacity
- Many elite players now reach top speeds over 30 km/h
- Top performers hit 33–34 km/h, similar to men’s professional levels from a decade ago
3. Position-Specific Physical Demands
- Midfielders: Highest total distance (10–11 km per match)
- Defenders: Most frequent decelerations and reactive sprinting (especially in defensive blocks)
- Wingers and strikers: Highest top speeds and sprint frequency
New Challenges: Overload & Fatigue
1. Schedule Saturation
- Growing number of competitions (domestic, international, UWCL) leads to: Chronic fatigue
- Increased injury risk — especially ACL injuries in elite female players – 2 per competition?
2. Monitoring Is a Must
Top teams now routinely use:
- Daily wellness check-ins
- CMJ and Nordic testing (as used in Dinamo’s setup)
- Session RPE + ACWR tracking via platforms like Ultrax
- Menstrual-cycle-adjusted protocols for individualization
What Has Happened to the Game Itself?
- Technically: More short-passing sequences
- Extended possession cycles
- Sophisticated build-up play
- Tactically:Increased organization and coordination
- Structured pressing
- Shift from man-to-man to zonal defending
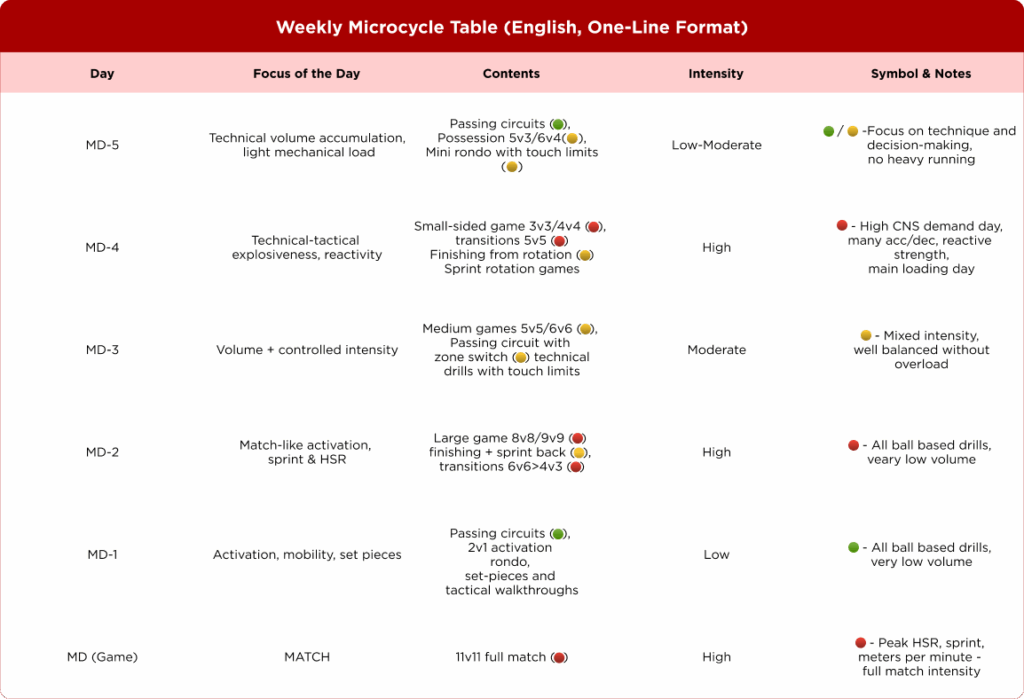
Message #1: Follow the Match Day Structure
One of the biggest lessons — and opportunities — in team conditioning, especially at the development level, is learning how to think in Match Day (MD) structures.
I’ve been talking about this for quite some time: during a standard weekly cycle, not every day is the same — and it shouldn’t be. Instead of thinking in isolated training sessions, we should start thinking in daily roles within the weekly plan.
Mini-Cycles Within the Week
A 7-day week can actually be split into two smaller “micro-blocks” if needed — especially when you have congested schedules, limited pitch access, or you’re coaching in grassroots conditions with irregular rhythms.
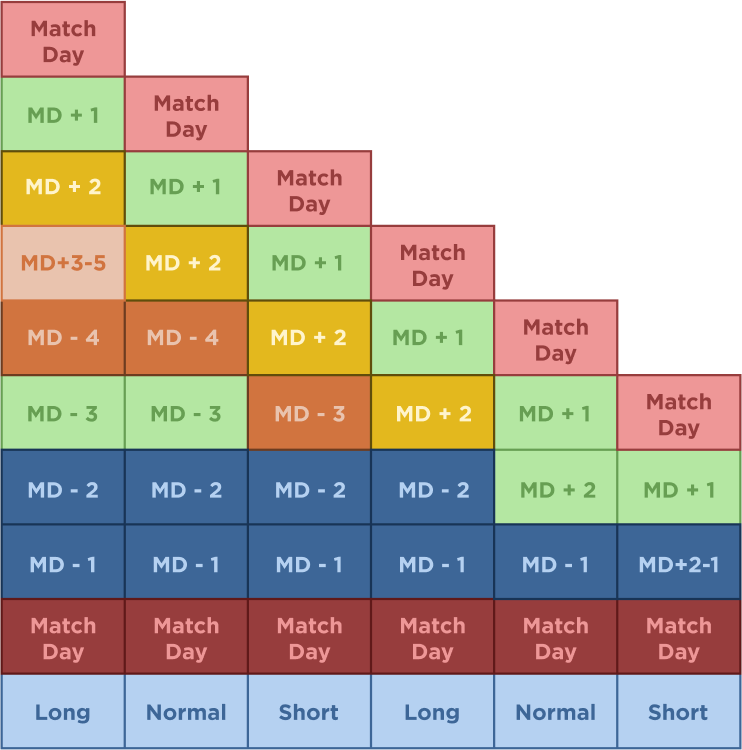
Here’s a simple rule to follow:
- MD+1 and MD+2 → Use for recovery, regeneration, or light technical work
- MD-2 and MD-1 → Use for tapering, activation, and match preparation
- Days in the middle (usually MD-4 and MD-3) → Focus on development (e.g., strength, intensity, speed, tactical learning)
This format allows you to assign purpose to every day, even with only 2 or 3 training sessions per week. The MD structure gives each day a “color” and a “goal” — and you can adapt the cycle to your resources, rather than trying to copy elite systems blindly.
Adapting with Color Coding
If you only train 2x per week, you can still follow the logic:
- One day is your high-load development session (🔴)
- The other is your pre-match taper + activation (🟡 or 🟢)
And if you have 3–4 sessions per week, you can expand into a red–yellow–green rhythm:
- 🔴 Day = Intensive, demanding: small games, transitions, strength
- 🟡 Day = Technical-tactical, controlled intensity
- 🟢 Day = Recovery, regen, or technical refinement
Message #2: Start Thinking in Patterns — Not Just Numbers
When I was responsible for performance and physical analysis at club level, I spent a lot of time exploring data through tools like Power BI. I was fascinated not just by the numbers, but by the why behind the numbers. Why does this drill generate those values? What happens when we change the format, the time, the pitch size, or the number of players?
Over time, something powerful happens: You begin to notice patterns.
Not just in the players — but in the drills themselves.
Drills = Predictable Outputs
After enough time watching sessions and games through a physical lens, you begin to estimate values intuitively:
- Do 3v3 games for 6×2’ → you’ll get high meters/min, tons of accelerations, but almost no sprint distance.
- Do 8v8 for 5×4’ → you’ll see higher total distance, more sustained high-speed runs, but lower metabolic cost per minute.
- Add a goal → increase intensity. Add constraints → increase decision density.
And then you realize:
Every drill leaves a signature. And the more you understand the signature, the better you can plan, monitor, and adjust your session — without any GPS.
This is especially useful for coaches without equipment, who rely on logic, structure, and feel. And it’s exactly why color coding (🔴 🟡 🟢) matters — because you start seeing the game through energy, speed, and output… not just through drills on paper. We often admire elite teams like Spain for their passing accuracy and volume, or England for their ball recoveries and intensity, but sometimes forget that the first step in reaching those levels is not a GPS unit or a data analyst — it’s simply tracking what we do and how long we do it.
In fact, most elite-level metrics start from something very basic: “How many minutes did we spend on a drill?”
This alone is the first pillar of monitoring — especially in environments without tech.
If you run a 4v4 transition drill for 6 x 1.5 minutes, three times in three weeks, you’re building a database. After some time, you’ll know exactly what to expect: → Total distance per block, number of accelerations, and the likely sprint output
Example: Progressive 4v4 Block – 3 Weeks
This drill is a classic high-intensity format, ideal for small-sided game conditioning, technical load, and decision fatigue — and also a great way to begin estimating physical load over time.
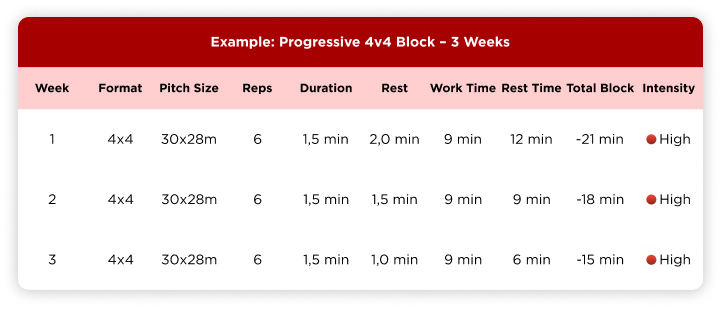
Coaches who don’t have access to data tools or GPS systems can still begin building internal performance benchmarks by simply tracking the number of minutes spent on each drill, recording player responses, and being consistent in how they structure their training. Over time, this kind of structure becomes predictive.
This awareness creates a basic monitoring system that can inform load management, session planning, and player readiness — even without external tech. In fact, even elite teams start with this same foundation. The only difference is that they later layer it with more data and precision tools. But the logic remains the same — structure leads to understanding, and understanding leads to better decision-making. So, next time when you want to increase or decrease the load, just look at your notebook.
Legend
- m/min = average meters covered per minute of activity
- Acc/Dec = number of accelerations and decelerations per minute
- HSR = high-speed running (typically >19.8 km/h)
- Sprint Distance = distance covered above sprint threshold (e.g. >25 km/h)
- Values are approximate and vary depending on pitch size, level, and execution intensity
Estimating Load Without GPS: One Transition Game Example
If you’re working without GPS or live tracking systems, one of the simplest and most powerful tools you still have is time. By tracking how long you run a drill, how often you use it, and how it’s structured (number of players, space, rest), you can begin to build internal benchmarks for physical load.
Let’s take a practical example.
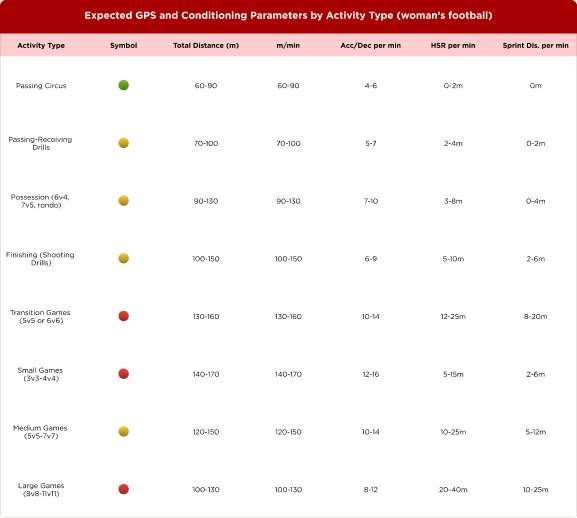
Imagine you’re running a transition-based drill – 5v5 or 6v6 – played on medium-sized pitch. You schedule 4 sets of 3 minutes, which gives you a total of 12 minutes of effective work. Based on observational GPS data from elite environments, this type of drill typically produces:
- 130–160 meters per minute of total distance
- 12–25 meters per minute of high-speed running (HSR)
- 8–20 meters per minute of sprinting
- 10–14 accelerations and decelerations per minute
So over the course of this 12-minute drill, you can expect your players to accumulate:
- Around 1,560 to 1,920 meters of total distance (closer to 1-1.5km)
- 144 to 300 meters of high-speed running
- 96 to 240 meters of sprint distance
- 60 to 80 high-intensity actions (acceleration and deceleration)
That’s a serious physical return — and it’s only one drill.
How Does This Compare to Match Load?
In a full 90-minute match in elite women’s football, a player typically covers:
- 9,000 to 11,000 meters of total distance
- ~800 to 1,063 meters of high-speed running
- ~223 to 307 meters of sprint distance
- ~110 to 200 total acc/dec efforts (high)
So in just one well-executed 12-minute transition block, you’re delivering:
- 15–20% of match-day HSR
- 30–70% of match sprint distance
- 50–60% of total acc/dec volume
Of course, these values can shift dramatically depending on how the drill is designed and delivered and this values they are here just for the sake of example. The actual output will be influenced by:
- Pitch dimensions – Larger space allows for higher top speeds and longer runs
- Number of players – Fewer players = more physical output per individual
- Tactical goal – Drills focused on pressing, counter-attacks, or transitions naturally boost HSR and sprinting
- Coach engagement – Encouraging tempo, enforcing
Message #4: Constraints Shape the Demands – Use Them Wisely Across the Week
Not all exercises are created equal. What you ask the players to do — and how you structure the drill — directly shapes what you’ll get from them in terms of:
- Physical intensity
- Tactical decision-making
- Number of technical actions
- Repetition of football actions
This is why elite teams (and smart grassroots coaches) manipulate constraints with intention — especially when they don’t have GPS to measure output.
Physiological Load Is Defined by Constraints
Certain elements of your session raise physical demand:
🔺 Higher Load Conditions:
- Fewer players on the pitch
- More space per player
- No goals or small goals → more continuous play
- Limited touches
- No goalkeepers
- Coach encouragement
- Man-marking
- Playing in numerical inferiority
And others reduce the physiological cost:
🔻 Lower Load Conditions:
- More players
- Less space per player
- Official rules for scoring
- Free-play conditions
- With goalkeepers
- Passive coaching
- Balanced numbers
This simple logic allows you to design your training days intentionally — based on the type of output you want and where that day sits in the weekly structure.
Football Actions Also Depend on Structure
Interestingly, not all high-intensity environments mean more decision-making. If you’re aiming for more football actions (like passes, shots, 1v1s), you need to think differently:
🔺 More actions when:
- Fewer players
- Smaller pitch (closer opponents)
- No goals / more chances
- Free-flow games
🔻 Fewer actions when:
- More players
- Larger pitch (spread spacing)
- Full-rules games
- Touch limits
In short — you design the outcome by controlling the environment.
Three Exercise Levels – Hit Them All
Just like we have different types of days in the microcycle, we should also have different levels of exercise:
🔴 Red: High-intensity, high output, heavy load
🟡 Yellow: Moderate-intensity, technical and tactical focus
🟢 Green: Low-intensity, activation or recovery, but still game-relevant
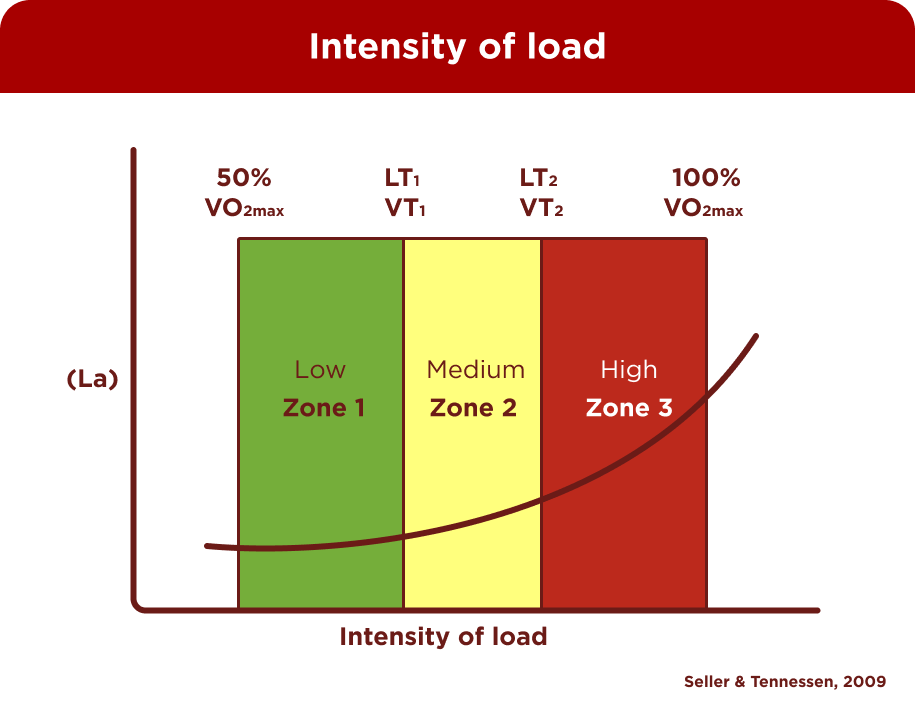
Training Color Zones in Football Conditioning
Using a color-coded framework (green–yellow–red) helps coaches quickly communicate and categorize session intensities across the week. Inspired by Seiler’s three-zone model, this system reflects internal load (heart rate, RPE)and external load (speed, distance, type of action) — and is now widely used in football periodization.
Each color represents not only a physiological demand, but also a purpose and application window across the microcycle.
🟢 Green Zone – Aerobic Foundation & Recovery
- Objective: Develop general aerobic endurance, improve cardiac output, support recovery
- Physiology: 60–75% max HR, RPE 4–5
- External Load: 8–11 km/h pace, continuous 10–12 min bouts, 3 series
- Session Example: Low-intensity continuous running, cycling, walking drills, or aerobic rondos
- When to Use: MD+1, MD+2 → Recovery,Home sessions, Intro to aerobic base in pre-season, Bookend of mixed-intensity sessions (warm-up or cooldown)
Football Application Tip: You can design a “green football session” by playing large-possession games (e.g., 10v10+neutral) with limited pressing and larger pitch, encouraging continuous movement without sudden bursts with more rest periods between actions.
🟡 Yellow Zone – Sub-Threshold Development (Lactate Threshold Work)
- Objective: Push players closer to the anaerobic threshold, delay fatigue, increase tempo endurance
- Physiology: 80–90% max HR, RPE 6–7
- External Load: 12–14 km/h pace, 6–8 min sets, active rest in between
- Session Example: 4×8 minutes tempo runs, mid-size games (5v5–7v7), possession with directional play
- When to Use: MD-4 or MD-3, Specific conditioning focus days, When improving game tempo and prolonged pressing is key
Football Application Tip: Take a standard rondo or possession drill and limit time on the ball, reduce space, or require directional play → now, the same drill shifts into yellow zone by elevating the physiological strain.
🔴 Red Zone – High-Intensity Interval Load / Match Simulation
- Objective: Increase VO2max, improve repeat sprint ability, condition for match tempo and bursts
- Physiology: 90–100% max HR, RPE 8–10
- External Load: 16–20+ km/h bursts, 15–90 sec work, 2–3 min rest
- Session Example: Sprint relays, repeated shuttle runs, 3v3/4v4 high-intensity games, finishing with transitions
- When to Use: MD-2 (shorter volume), MD-4 or MD-3 (in high-intensity development blocks), Tactical match simulations
Football Application Tip: You can run a red zone session without formal running drills. For example:
- Use 3v3 with end zones, small goals, short rest
- Design wave games (6v6 → 4v3) with directional transitions
- Run finishing games with sprinting back to defend = high mechanical & physiological stress
Manipulating Constraints to Hit the Desired Zone
The beauty of this approach is that any drill can live in any color — if you change the constraints. You don’t need separate “conditioning sessions” to target these zones — you can hit them through football by adjusting:
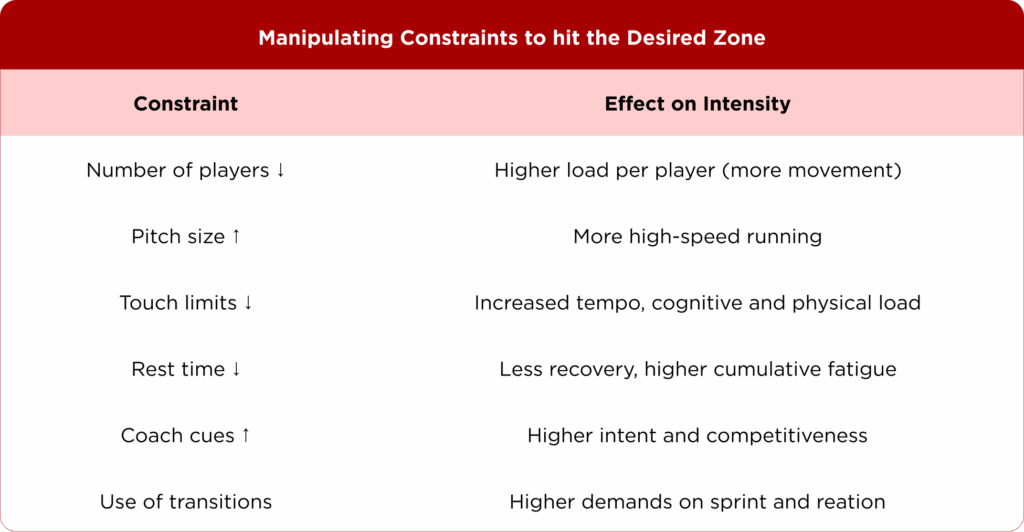
Even without a sports science team, you can make world-class decisions by simply asking:
“What’s the goal of the day — and what kind of drill fits that?”
Use constraints to scale up or down the intensity and the action density. Use colors to plan your week with balance and clarity.
Message 5: Strength Training & Injury Prevention in Women’s Football
In the evolving landscape of women’s football, the physical demands on players have risen — but access to high-quality gym facilities or equipment often hasn’t kept pace. Still, strength and injury prevention training remain essential for long-term player availability and performance. Research continues to show that proper strength training, especially for the hamstrings, adductors, glutes, and core, plays a crucial role in reducing injuries like ACL ruptures, hamstring strains, and groin pain.
Here is a practical, two-day no-equipment training solution for women’s football teams. It is based on in-season integration and follows a simple structure. Ideal application days are MD+2/3 for recovery and posterior chain focus, and MD-2 for adductor/core work and match preparation.
Weekly Strength Program (2x per Week – Women’s Football, No Equipment)
Training 1 – MD+2/3 (Posterior Chain Focus):
Warm-up: Forward/backward leg swings (3×4/leg), lateral leg swings (3×4/leg), skip A, B, C (2×10 m).
Plyometrics: CMJ with landing focus (2×3), standing long jump (2×3).
Hamstring Prevention: Nordic hamstring curls (2×4) Adductor Prevention: Copenhagen plank (3×15–20 sec/side).
Lower Body Strength: Bulgarian split squat (3×6/leg). Posterior Chain/Glutes: Single-leg glute bridge (3×8/leg). Upper Body & Core: Pull-ups or TRX rows (3×5–8), plank with leg lifts (3×30 sec).
Training 2 – MD-2 (Adductor + Core Focus):
Warm-up: Circular leg swings (3×4), high knees, butt kicks, lateral crossover drills.
Plyometrics: Lateral CMJ (2×3), line hops forward/backward (2×10 sec).
Hamstring Prevention: Nordic hamstring curls (2×4) 👉 consistent use = stronger posterior chain. Adductor Prevention: Copenhagen plank (3×15–20 sec/side).
Lower Body Strength: Step-ups on box (3×6/leg). Posterior Chain/Glutes: Wall sit isometric (3×30–45 sec). Upper Body & Core: Push-up with rotation/arm opening (3×6/side), deadbug (3×6/side).
The structure is minimalistic, coach-friendly, and delivers effective protection and performance improvement.
Message 6: Monitoring Made Simple — Even Without GPS
If you can’t afford GPS, wellness platforms, or force plates — don’t worry. You can still build a robust internal monitoring system using nothing but a stopwatch and paper
Monitoring isn’t about expensive technology. It’s about starting conversations, identifying risk, and guiding smarter training decisions.
Core Monitoring Components (Low-Resource Friendly)
CMJ Test: 2 jumps from standing, measured manually or via MyJump app. Used on MD+2 and MD-1 (≈3 min).
Nordic Strength Test: 2 controlled eccentrics, score form (1–3 scale). Used on MD+2 (≈5 min).
RPE (Rating of Perceived Exertion): 1–10 scale after each session. Used daily (≈1 min).
Wellness Questionnaire: 5 questions on sleep, soreness, stress, energy, fatigue (scale 1–5).
Used daily before training (≈2 min).
Injury Log: Manually record missed sessions, pain zones, duration. Continuous. Drill Block Duration: Record how long each block lasted (e.g., 4v4 – 6×1.5 min). Daily.
Weekly Monitoring in the Microcycle
MD+2: Strength + 3v3/4v4 games → CMJ, Nordic, Wellness, RPE
MD+3: Possession, rondos, passing → Wellness, RPE, Block durations
MD-3: 5v5 + finishing drills → Wellness, RPE, Block durations
MD-2: 8v8/9v9 + transition games → CMJ, Wellness, RPE, Game durations
MD-1: Light activation, set-pieces → Wellness
MD: Match day → RPE post-match, 🩹 Injury notes
Example of Manual Monitoring Entry
Iva → Day: MD+2 → Wellness: 4 → RPE: 6 → CMJ: 29 cm → Nordic: 2 → Injury: No → Notes: — Player:
Ana → Day: MD+2 → Wellness: 3 → RPE: 7 → CMJ: 26 cm → Nordic: 1 → Injury: Yes (adductor strain) → Notes: out 2 days
You can now track warning signs: for example, ↓ CMJ height + ↑ RPE + ↑ stress = potential overload.
Final Thoughts & Inspirational Quotes
“You can’t improve what you don’t measure.” — Peter Drucker
No matter the level, without measuring, you are making decisions based on feel, not facts.
“Monitoring is not about numbers. It’s about asking better questions.” — Martin Buchheit
Data opens better conversations — between players, coaches, and the medical team.
“It’s not about how hard you train, it’s about how smart you recover.” — Dr. Shona Halson
Recovery is not a passive state — it’s an active part of the performance puzzle.
“The best system is the one that you can consistently apply, not the most expensive one.” — Adapted from elite sport science
In grassroots or elite setups, consistency beats complexity every time.